Table of Contents
1.0 Configure the new Webchat in Saysimple
1.4.1 Adding Custom Fields to your form
2.0 Manage and review your Webchat Widget
3.0 Add the code to your website
3.1 Add directly to your website
4.0 Frequently Asked Questions
4.1 What if CSP (Content Security Policy) is blocking the Widget?
4.2 Can I Hide the Webchat Widget and Use a Button or Link Instead?
1.0 Configure the new Webchat in Saysimple
-
In the Saysimple platform, click the gear icon on the left sidebar to open Settings.
-
In the Channels section, click the blue “Manage channels” button.
-
In the top right corner, click the blue “Web chat login” button. A new window will open.

In the top right corner, click the purple “+ Create New Chat” button. A new window will open.

The webchat generator has four tabs you can use to customize the widget:
- General
- Form
- Working hours
- Custom fields
We'll discuss every tab in the steps below.
1.1 General
In the General tab, you can set your profile picture, brand color, language, widget position, and welcome message. Some fields are for internal use, others are visible to users.
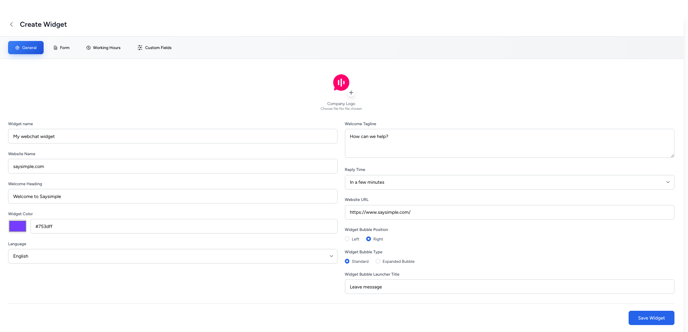
| Field | Description | Usage |
| Company logo | Set your company logo | User-facing |
| Widget name | Set your widget name | User-facing |
| Website name | Set your website name | Internal use |
| Welcome heading | Set the heading title of your webchat | User-facing |
| Widget color | Set the brand color of your webchat widget | User-facing |
| Language | Set the language of your webchat widget | User-facing |
| Welcome tagline | Set the tagline of your widget, shown beneath the webchat welcome heading | User-facing |
| Reply time | Set your general reply time | User-facing |
| Website URL | Set your website URL | Internal use |
| Widget bubble position | Set the position of your widget on your website | User-facing |
| Widget bubble type | Choose between basic and advanced | User-facing |
| Widget bubble launch title | Only applicable for the advanced widget bubble type | User-facing |
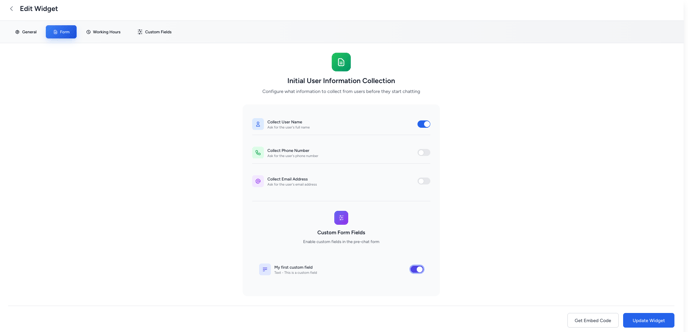
1.2 Form
In the Form tab, you can choose which information to collect from users before they start a chat. By default, you can collect:
- Name
- Phone number
- Email address
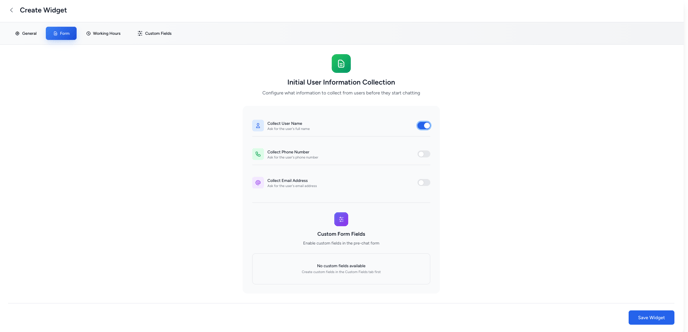
You can use the Toggle to activate or deactivate the fields in your pre-chat form.
Once a form is completed by a user, this information is added to the contact profile in Saysimple and shown in the first message of the conversation.
You can also add custom form fields as explained in section 1.4.
1.3 Working hours
In the Working hours tab, you can set the opening hours for your webchat widget.
Note: You must activate this setting, otherwise the widget will remain offline for users.
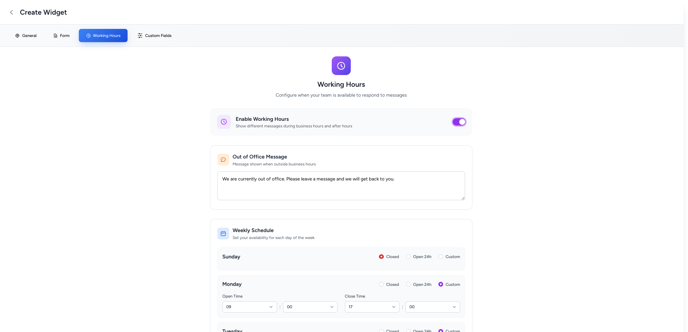
The webchat working hours are not linked to your Saysimple account’s general working hours. This means you have to set both.
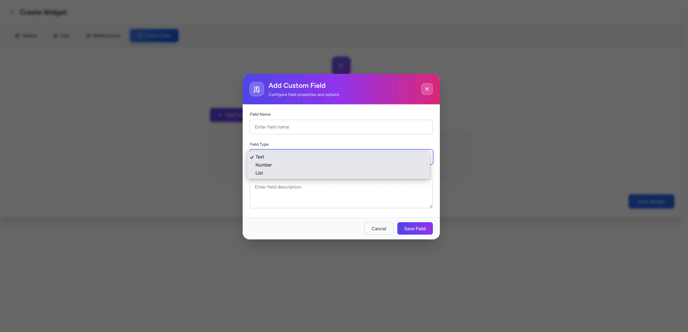
1.4 Custom Fields
In the Custom fields tab, you can create additional fields for your form. You can choose from:
-
Text field
-
Number field
-
List field (shown as a dropdown menu which allow you to offer multiple choice options to users.)
1.4.1 Adding Custom Fields to Your Form
-
After creating your custom fields, click Save.
-
When all fields are created, click the Save Widget button in the bottom right corner. A code block will appear. You can close it for now.
-
Go back to the Form tab and switch on the custom fields you want to include.
-
Click Update widget to save your changes.
2.0 Manage and review your Webchat Widget
After updating, you will return to the Webchat overview screen. Here you can manage and review your widget.
If everything looks correct, click </> Get Code and continue with step 3.
3.0 Add the Code to Your Website
You have two options to add the code to your website:
-
Add it directly to your website
-
Use Google Tag Manager
3.1 Add directly to your website
-
Copy the HTML code.
-
Paste it just before the closing </body> tag on your website.
This ensures the webchat widget loads correctly.
3.2 Using Google Tag Manger
- Copy the HTML code.
-
Go to Google Tag Manager (https://tagmanager.google.com/) and log in.
-
In your workspace, select the correct container for your website.
-
In the left menu, click “Tags”.
-
Find the tag where your old Saysimple Web Chat code is installed.
-
Click the tag name to open it.
-
In the tag editor, replace the old HTML code with the new HTML code you copied from Saysimple.
-
Click “Save” to save your changes.
-
In the top right corner, click “Submit” and then “Publish” to make the new code live on your website.
More information about Google Tag Manager can be found in the Google Support Center.
4. Frequently asked questions
4.1 What if CSP (Content Security Policy) is blocking the Widget?
You can use the following settings to prevent CSP from blocking the Widget script:
default-src 'self';
script-src 'self' https://web-chat.saysimple.io;
connect-src 'self' https://web-chat.saysimple.io wss://web-chat.saysimple.io;
style-src 'self' 'unsafe-inline' https://web-chat.saysimple.io;
img-src 'self' data: https://web-chat.saysimple.io;
font-src 'self' https://web-chat.saysimple.io;
How can I add these CSP rules to my website?
- WordPress → Use a plugin such as HTTP Headers or edit the .htaccess file if your site is self-hosted.
- Wix / Webflow → Some plans let you add CSP rules in Custom Headers under site settings.
- Cloudflare → If your website runs through Cloudflare, you can add CSP in Cloudflare Rules → Response Headers.
4.2 Can I Hide the Webchat Widget and Use a Button or Link Instead?
Yes. You can configure a custom click-to-chat trigger that opens the webchat widget when a user clicks a button or text link.
If you want to hide the chat icon when the page loads, simply add this line before the script runs:
window.chatwootSettings.hideMessageBubble = true;
This tells the widget to load in a hidden state. When added to the full HTML code, it should now look similar to this:
<script>
  window.chatwootSettings = {"position": "right"}; //Initial settings for your chat
  // 👇 Hide the chat bubble initially
  window.chatwootSettings.hideMessageBubble = true;
   (function(d, t) {
    var BASE_URL = "https://web-chat.saysimple.io";
    //REST OF THE CODE
Once the chat widget is loaded, you can control it with JavaScript. For example, you can add a button or link that opens (or toggles) the chat manually.
Example for an URL:
<a href="javascript:void(0)" onclick="window.$chatwoot && window.$chatwoot.toggle()"
   class="px-4 py-2 bg-indigo-600 text-white rounded hover:bg-indigo-700 transition">
  💬 Toggle chat
</a>
Example for an button:
<script> document.getElementById('open-chat').addEventListener('click', function() { if (window.$chatwoot) { window.$chatwoot.toggle(); // Opens or closes the chat } else { console.log("Chat not loaded yet"); } });</script><button id="open-chat"> :speech_balloon: Open chat</button>